Email Marketing
Email QA Checklist: 7 Steps to Nail the Quality Assurance Process
When it comes to effective email marketing, the question of quality vs quantity is easy to answer. Would you rather send a high-quality email campaign to 1,000 subscribers or an ugly, malfunctioning mess to 10,000 of your contacts?
Email quality assurance (QA) is the key to optimizing each campaign so you deliver your best to every inbox. Senders who care about quality use an email QA checklist (aka a pre-send checklist) to make sure subscribers have an ideal experience when they open and engage with the latest promotions, newsletters, and more.
But what should be on that email QA checklist? How can you be confident that every “t” is crossed and every “i” is dotted before you hit the send button?
Let’s take a closer look at the email quality assurance process and what should be on every sender’s checklist.
What is email quality assurance and why is it needed?
Quality assurance is the process of checking a product or service against specific standards to determine if it meets expectations before ending up in the hands of the people who use it.
For example, in manufacturing there are often people who inspect products as they leave the assembly line to make sure they are free of defects. In the world of software development, quality assurance is used to test new products, features, and updates checking for bugs and flaws before being released to users.
So, what’s email quality assurance, and what’s so important about conducting QA for emails? Oh boy, don’t get us started. Just as you’d never want to release a broken product to the market, you must do whatever you can to avoid sending broken emails to your list.
If you’ve worked in email marketing for a while, you’re probably aware of the many things that can go wrong. Perhaps the most notorious of all the challenges is dealing with how email clients render code.
That’s right. It’s not just mobile and desktop you need to worry about. The way Gmail, Outlook, Yahoo Mail, and Apple Mail display HTML emails varies because they all have various levels of support for CSS and other factors. Certain devices and operating systems may cause inconsistencies too. That’s why previewing emails in different clients and live devices is an important part of any email QA checklist.
Manual vs automated email QA checklists
Back in 2021, we surveyed senders to find out if and how their teams test email campaigns before they launch. More than half of those surveyed said they did have a documented email QA checklist. But of those teams 57% were still using a manual process.
So, what’s the difference between manual and automated email QA?
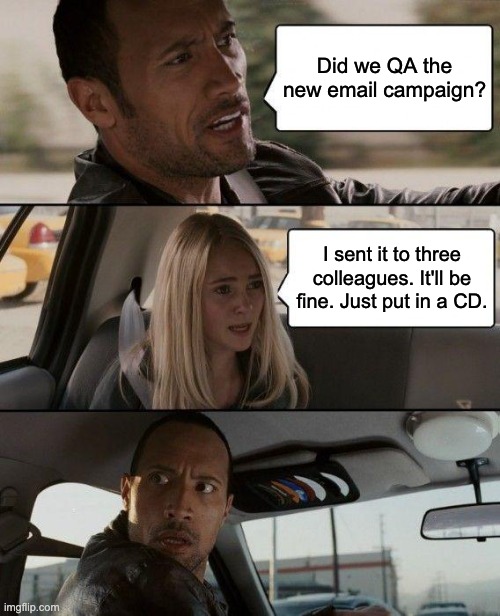
With a manual process, an email marketer typically sends a new campaign to a few other people in the marketing department. Colleagues look it over, click the links, and report back with anything they noticed that looked strange or didn’t work.
That’s better than nothing. But it is far from being a comprehensive email QA process, and it leaves a lot of room for human error. Did your colleagues really take a close look, or did they get distracted? Are you sure they viewed the campaign on problematic email clients like Outlook? Did anyone check how it looked in dark mode?
An automated email pre-send checklist streamlines the process. It’s software that takes you through each step, ensuring there’s a thorough review while allowing for feedback and collaboration from the team.
7 steps for a solid email QA process
Once you hit send, there’s no going back. Mess things up and you may be forced to do the email geek version of the walk of shame… the dreaded oops email.
Whether you do it manually or get help from an automated solution, here are seven indispensable pre-launch checks for email campaigns:
1. Copy check (spelling, typos, etc.)
A typo in a marketing email isn’t the end of the world. But spelling errors are embarrassing, especially in the subject line. Get too slopy with your email copywriting and it will reflect poorly on your brand. Can you trust a company that can’t’ keep there their they’res and theres straight?
These days, it seems like it would be hard to make errors in copywriting. Pretty much any application you use to write content is going to put red squiggly lines under your mistakes. Yet, like nasty little gremlins, they still find a way in there.
Last minute additions from the boss. Weird stuff from tracked changes. A cat sitting on your keyboard. Whatever the reason, it’s worth taking the time to check email copy from top to bottom one last time.
The worst thing that can happen is when an inappropriate word is accidentally included in an email. (FYI: Before you believe this 2016 split test from Phrasee, check the date.) Since they are real words, traditional spell check won’t catch those profanities, but you had better believe your subscribers will.
How it works with Sinch Email on Acid
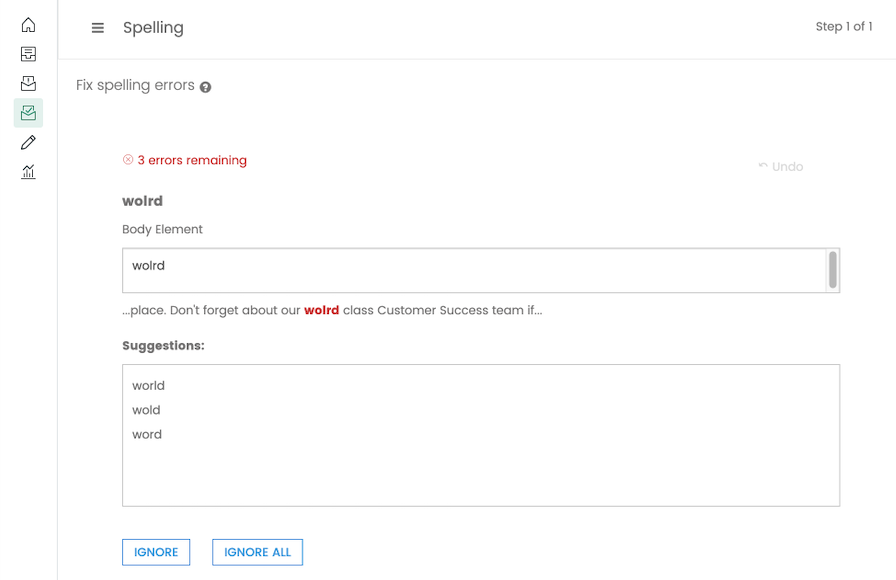
When using the Email on Acid platform, you run Spell Check on the final version of your campaign. And it’s not just checking the body copy. This feature reviews the alt text for images and looks for typos in your preheader text too.
A built-in profanity filter also alerts you to potentially inappropriate language. In fact, if there are certain words you want to avoid (dirty or otherwise), it’s even possible to add them to the filter so you can catch and remove them before you hit send.
2. Optimize inbox display
Email marketers pride themselves in writing compelling subject lines that boost open rates. But the subject line isn’t the only thing subscribers see before they choose whether to open or ignore your message. The preheader or preview text as well as the sender or from name also play a role in that decision.
The email QA process should include a step in which you review how all three of these inbox display elements work together. Preheader text should supplement the subject line copy. And the sender name matters too. The report Email and the customer experience from Sinch Mailgun found 94.5% of consumers said recognizing the brand or sender name was important when deciding which emails to open.
How it works with Sinch Email on Acid

Email on Acid’s Inbox Display feature provides a preview of how your message is likely to show up in subscribers’ inboxes on a variety of popular devices. Keep in mind, the space you have for subject lines and preview text is smaller on mobile devices, and it differs depending on the device and application.
This step of the email QA process helps you optimize for increased opens and ensures you don’t waste time writing a subject line masterpiece that ends up being just a little too long for mobile.
3. Evaluate email accessibility
Can every subscriber on your list view and engage with what you’re sending? It’s almost certain that a percentage of your audience has vision problems. Some of them are using screen readers to help them access your emails.
Designing and coding accessible emails is extremely important – not just because it boosts engagement, but because it’s the right thing to do. You need to know if you’re using a legible font, if color contrast is appropriate, if every image has alt text, if CTA buttons are easy to click, and much more.
Making email accessibility part of your design system and your quality assurance checks ensures that your campaigns are more inclusive and easier for all subscribers to engage with.
How it works with Sinch Email on Acid
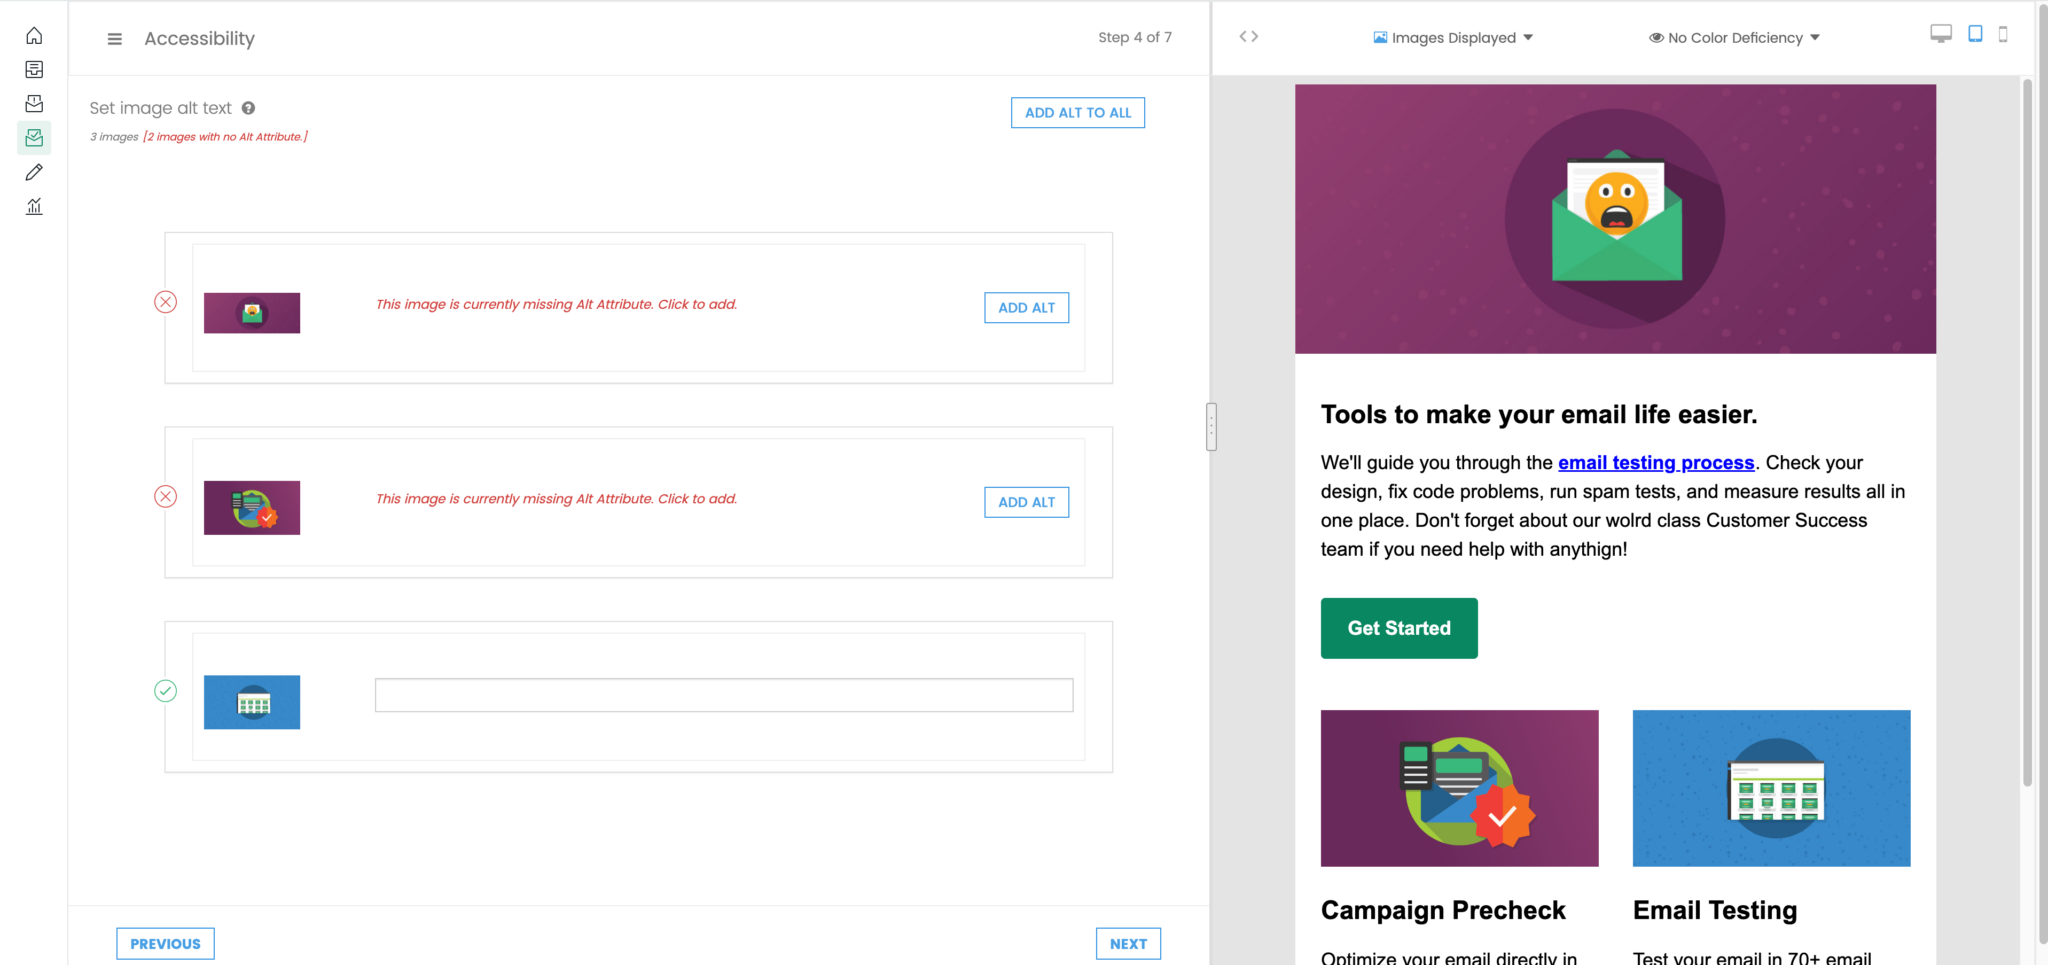
We built Email Accessibility checks into our quality assurance platform because we are big believers in how important it is. We also walk the walk while talking the talk. In fact, our company was one of very few who passed the Email Markup Consortium’s accessibility evaluation.
Email on Acid’s solution makes automatic updates to code that improves accessibility. It also includes tools to check color contrast and even to view your campaign through filters that simulate color vision deficiencies.
4. Validate links/URLs in the email
One of the biggest missed opportunities in email marketing is the broken or incorrect link. You convinced them to open and click. Then – you send them to the wrong landing page or a 404 page.
Manual email QA can usually catch these mistakes, but why leave something so important to chance? A good inbox experience relies on the connections between emails and landing pages.
Tracking clicks to those landing pages is also important if you want to understand what happens after people leave the inbox. But UTM parameters are easy to forget and can be inconsistent, which makes in-depth reporting on email performance difficult.
How it works with Sinch Email on Acid
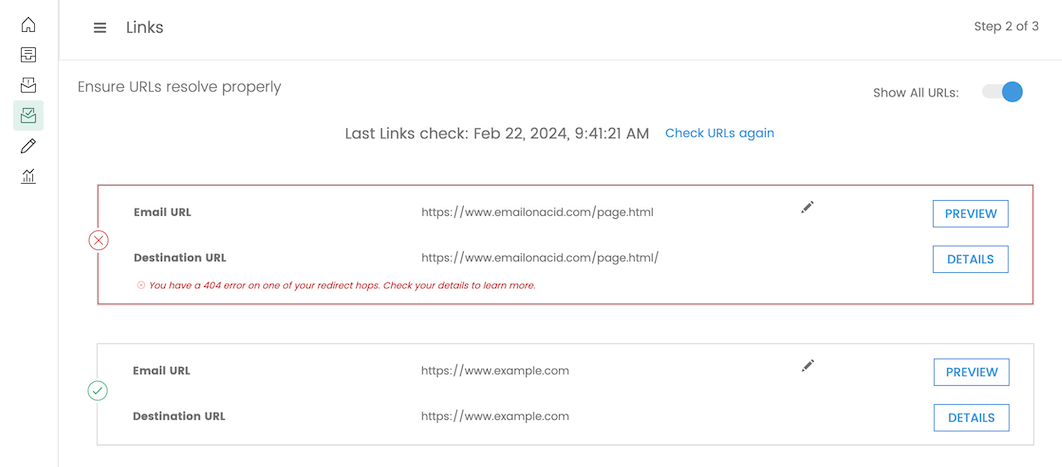
Email on Acid’s URL Validation feature streamlines the link checking process, making quality assurance more efficient and accurate.
It automatically reviews every hyperlink in your email, looking for errors, broken links, and potential issues with redirects. Easily fix and replace links and your email code gets updated. Plus, URL Validation also includes an option to check UTM parameters for consistency as well as reminders to add them to links you may have missed. That means you’re sure to track every visit from the email channel with accuracy.
5. Validate email images
Imagery helps bring HTML emails to life, but they can also be the source of some serious headaches.
Whether it’s issues with image padding and spacing, or large images that slow down your load times, a review of visuals and graphics needs to be included in your email QA checklist. Animated GIFs in email campaigns are another thing to consider. Different email clients treat GIFs in their own ways.
How it works with Sinch Email on Acid

Email on Acid helps you check and optimize your designs with our Image Validation feature. Using images that are too large and are slowing things down? This feature will resize your graphics and provide updated image files that are optimized for the inbox.
You can also adjust image attributes within the platform and select the frame of a GIF you want displayed as a fallback when the animation isn’t supported. As you go through the automated email QA process, this step alerts you to images that may need optimization.
6. Check for deliverability issues
It won’t matter how thorough your email QA checklist is if you end up in spam or get blocked by mailbox providers. That’s why email deliverability checks should also be part of quality assurance.
From a big picture perspective, this includes making sure you follow new sender requirements from Gmail and Yahoo in 2024. You should use email authentication protocols, keep your spam complaints low, and include a one-click unsubscribe link in email headers.
On an individual campaign basis, you want to make sure your domain and/or sending IP are not on an email blocklist and that your messages have the best chance of reaching the inbox.
How it works with Sinch Email on Acid

Email on Acid includes Deliverability checks in our automated email QA checklist. Find out if you are on any major blocklists and run your email through common spam filters to uncover potential deliverability issues before you hit send.
For a more comprehensive solution to improve inbox placement, check out Mailgun Optimize. It’s a complete deliverability suite with advanced features. That includes Inbox Placement Testing to see how major mailbox providers filter your emails. There are also Email Validation tools to help you keep your list clean and much more.
7. Test and preview your email campaign
The true test in your email quality assurance process comes when you preview your campaigns on different clients and devices. This should be the last step on your email QA checklist. That’s because you want everything else finalized before you see how the finished product gets delivered.
If you are a stickler for details or want to follow specific brand guidelines, you may be surprised to see that Gmail doesn’t support your preferred custom font. Or that Yahoo is adding extra space under all your images. This part of email testing is your chance to get down to the nitty gritty and get as close to perfection as you can.
How it works with Sinch Email on Acid
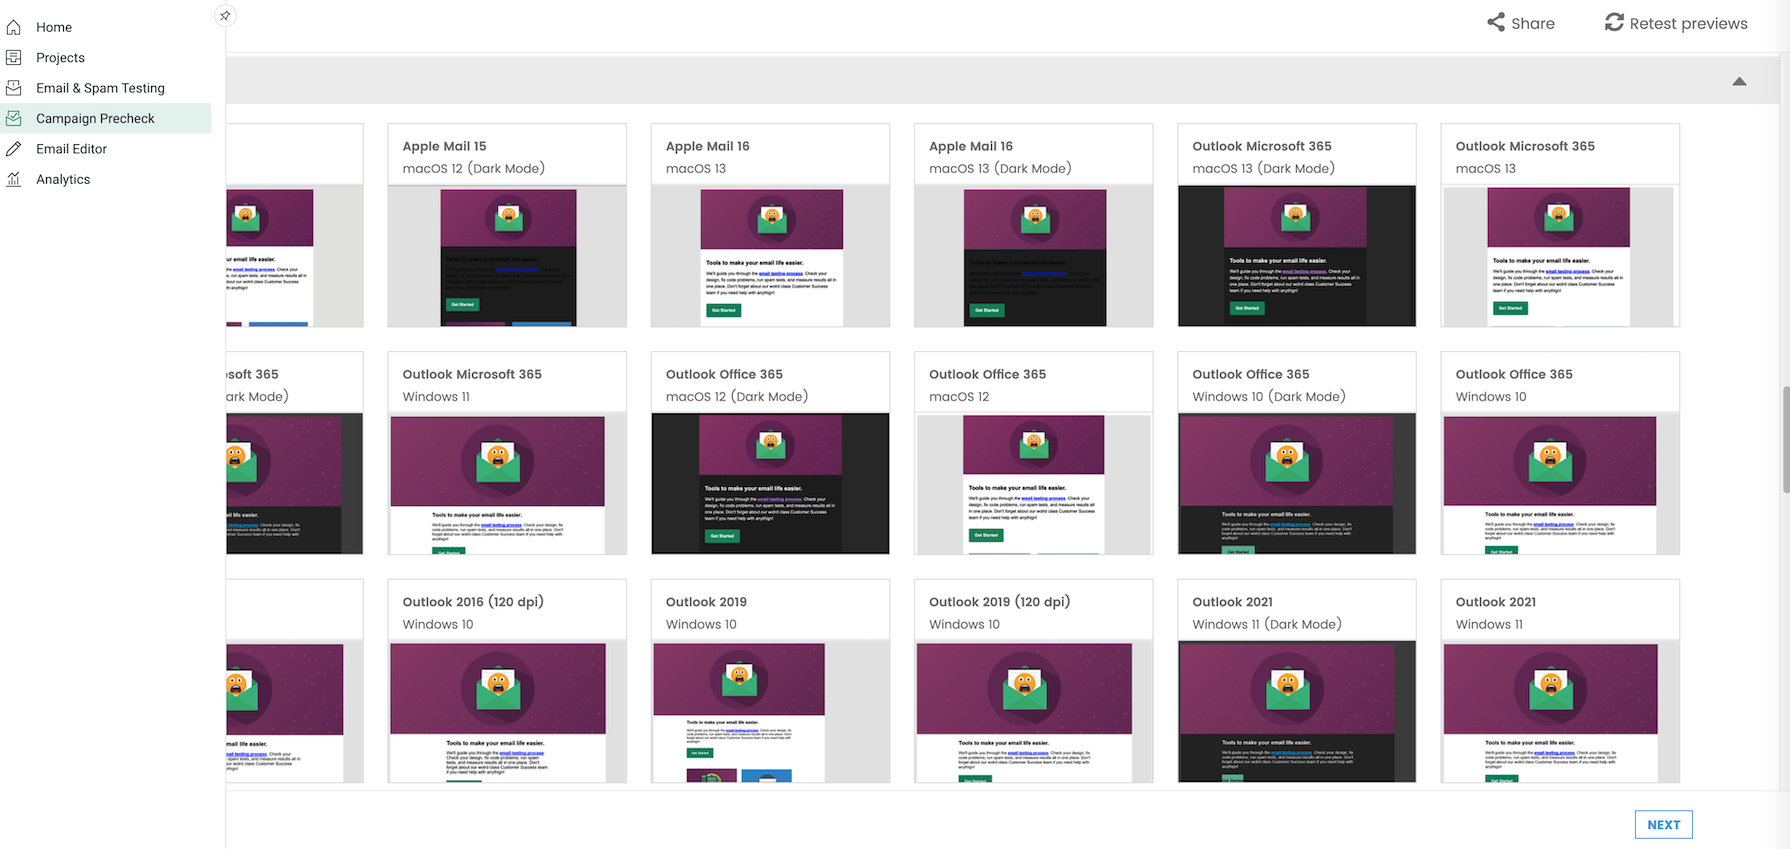
Email Previews are the shining star of our software. There’s a big difference between firing off a few emails to coworkers for review and checking out how emails render on 100+ clients and live devices. (Note the text visibility issues in some of the dark mode previews above.)
When you test your emails on our platform, we send back screenshots showing exactly how the campaign appears inside of inboxes. Then, you can choose individual previews to take a closer look at what’s happening when your campaign gets rendered. That’s how you’ll know if there are white lines in Outlook emails, for example. Or if your email is unreadable when opened in dark mode with Gmail. Fix things up before you launch so your email renders as intended.
The benefits of using an automated email QA checklist
There are two types of email marketers:
- The type who is itching to hit the send button ASAP to get some results.
- The type who gets nervous about hitting the send button because something could be wrong.
Both mindsets can be problematic, and both will benefit from a well-defined email QA checklist. You don’t want to rush into things, and you don’t want to be afraid to launch either.
Here are some of the benefits of conducting quality assurance with Sinch Email on Acid:
- Enjoy Unlimited Testing with every paid plan (test and tweak until you’re happy).
- Customize your email testing profile to include only the clients and devices you want.
- Use the built-in Email Editor to troubleshoot and make code changes without leaving the platform.
- Collaborate with others using Team Management features to review and finalize emails.
- Get advanced Email Analytics to help you understand more about your subscribers.
- Build a custom email QA workflow to include everything you want to check in the order you prefer.
We designed Sinch Email on Acid to give you send-button confidence and help you put your best email forward. Discover how our pre-send testing platform makes your email marketing more efficient while ensuring you send quality campaigns every time.