Industry News
What’s the Latest with AMP and How Can I Use It for Email?

Earlier this month Google announced that AMP HTML email is now live—but what is AMP? What do you need to know as an email marketer? How do you code an email in AMP?
Glad you asked.

What is AMP for email?
AMP (Accelerated Mobile Pages) is a developer’s care package from our friends at Google that lets you create a lightweight system with speedier loads. (Anyone else’s email development gears turning?) AMP is a framework made up of HTML, CSS and JavaScript—the classics.
Using parts of the AMP Project by Google for email, we now have a hefty list of components we can use.
How to get started:
Before we dive into the code, what email clients and email service providers (ESPs) currently support AMP HTML email?
Google-supported email clients:

Supported ESPs:


Update: Since the initial announcement in 2019, specific tools for creating AMP emails have emerged. One example is Mailmodo, which offers a drag-and-drop solution for building interactive AMP for Email elements, such as surveys, web forms, calendar bookings, and more.
If your ESP supports sending AMP HTML email (woohoo!) the next step is to register with Google to get your domain whitelisted. A spot on the whitelist is your best friend in that it tells spam filters your emails are safe to deliver to the subscriber’s inbox. That, and it’s essential in order to send dynamic content with AMP.
Registration Guidelines
There are a number of steps in the registration process for AMP, but luckily for you, this handy cheat sheet has all the need-to-knows.
Step 1: Use the Google email validation tool to ensure you have SPF (Sender Policy Framework) and DKIM (DomainKeys Identified Mail) set up for your sender domain.
Step 2: Send a test email (more on that later).
Pro Tip: If you plan to include dynamic information using the XMLHttpRequests (XHR’s), the XHRs from the sender’s domain (from: joe@company.com) and XHRs from the same domain or subdomain (company.com) need to match.
Step 3: Follow the Bulk Senders Guidelines from Gmail to help minimize spam complaints. This is very helpful to keep your domain whitelisted.
Keep in mind that for continued email validation, consistently send emails from your domain (@company.com), regardless of your organization’s size.
The registration process is a bit time consuming and could have longer waiting periods, sometimes up to a week or more, thanks to the influx of brands signing up. (Which must mean it’s worth the wait.)
Step 4: After all the registration requirements have been met, you can then send an AMP-compliant email with the correct MIME (Multi-purpose Internet Mail Extensions) type to ampforemail.whitelisting@gmail.com from the domain you have set up. For best results, send directly, don’t forward.
Step 5: Lastly, submit the registration form and grab a cold one while you, in Google’s words, “await our response.”

Creating an AMP Email
You can use any text-editor to create an AMP HTML email, but you’ll need internet to preview, as the email is processed through the AMP framework. With the AMP playground, you can preview the finished email and, after the build is complete, paste your email into the AMP Email Validator to check for any errors.
AMP HTML email can natively slot in beside your current text and HTML emails. AMP is simply another email MIME type, helping a program receiving a file understand how to read and display it.
You will need to create three separate versions of an email to send: text, HTML and AMP HTML. That way, if AMP isn’t supported it can fall back to the HTML and text versions. Happy day!
If you have any questions, the AMP HTML email section of the resource library is quite thorough.
Setting up Your AMP HTML Email Document
Being trendy and minimalist, every AMP HTML email has the minimum amount of code it needs in order to function properly.
The must have code:
- The doctype must be in HTML5 form:
- <!doctype html>
- Followed directly by the amp4email declaration after
- <html ⚡4email> OR <html amp4email>
- Then declare the where the first child has to be:
- <meta charset=”utf-8”>
- Next is the amp4email boilerplate tag (no spaces):
- <style amp4email-boilerplate>body{visibility:hidden}</style>
Finally, we have the script tag containing the ampproject information. Throughout the Google AMP HTML email documentation, the AMP component-specific script tags are between:
<script async src=”https://cdn.ampproject.org/v0.js”></script>
And now, the fun begins. It’s time to start the <body> of the email.
Below is what a complete valid base structure of an AMP HTML email looks like:

When building your email, every AMP component must have the matching script tag in the document head.
There are two scenarios that can render your AMP email invalid:
- The component is in the head but not the body or vice versa
- AMP HTML is not supported
What happens if your email is invalid?
The AMP police show up and confiscate your keyboard. Just kidding, but the AMP HTML email won’t display. It’s not quite the end of the world though, because this is the part where your email falls back to the HTML or text version I mentioned earlier.
Building emails with AMP is only slightly different from HTML. All of the styling needs to be in one block within the <style amp-custom> </style> tags. Inline styles are, unfortunately, not allowed and this style block has a 50,000 byte (character) limit. The validator will check for this.
AMP HTML email supports the same styles as normal email clients. Use Campaign Monitor’s handy CSS guide to find out what styles are supported and where. Some CSS is banned within AMP, such as:
- !important
- <link rel=”stylesheet”>
- Classes starting with -amp-or i-amp-
Other restricted styles include transition and @keyframes.
Since you can’t link to external stylesheets either, you can use custom fonts in the same way as in all email clients. AMP allows the use of @font-face using http or https addresses or <link> with these whitelisted sites:
Keep in mind: the recommended maximum width of am AMP email is 800px
Tracking and analytics work in the same way with AMP as HTML and a tracking pixel can still be used. However, the advanced tracking that is normally found on AMP pages is not allowed within amp4email. That said, the analytics still tell you which users engage with your email and their interactions with data, such as images in the <amp-carousel> or <amp-list>.
AMP Components
A huge plus of using AMP is that you can still use the same techniques you’re used to when creating an email, including the use of tables. As mentioned above, the styling does need to live in the head of the document, so this might feel like a minor shift if you’re used to inlining styles.
Using semantic markup such as <h1> or <p> keeps your emails organized, accessible and easy to style. The major change you’ll notice from regular HTML is the addition of ‘amp-’ prefacing each tag (ex: images as <amp-img> as opposed to <img>).
<amp-img>
This is a ‘built in’ component and doesn’t need a separate script declared at the start of the document. What you do need to declare is the width and height with every <amp-img> along with its other attributes: alt, layout and src. The layout attribute sets the behaviour of the image.
There are two layout types to work with:
- A fixed layout means the image will stay a fixed height/width
- A responsive layout means the image will scale to the container size
In the responsive layout, set the ratio of an image as opposed to pixels, as this allows for scaling (ex: instead of an image with width=”100px” height=”150px”, scale them to height=”1” width=”2”and this will resize the image proportionally no matter the device or email client being used).
Styling an image can be done within the <style amp-custom> tag in the head:

Then within the HTML:

<amp-carousel>
AMP has an image gallery that can be used to show multiple amp-img’s in the style of a carousel or slider and offers a variety of layouts. The <amp-carousel> allows you to add content in a horizontal display. This feature isn’t built in, so remember to include the corresponding script tag in the head:

Then within the HTML:
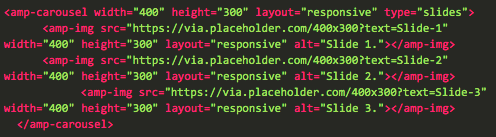
Within the opening <amp-carousel> tag, you set the width and height of the carousel, along with the layout (responsive or fixed). Now, you get to declare the type of image gallery you want displayed. For the sake of this scenario, let’s go with type=”slides”.
I created a simple email using the above components, validated with the AMP HTML email validator. Compared to the amount of code needed for a normal HTML email containing a carousel and the time it takes to build, this way was much shorter. Feel free to pull apart the code and get creative with your own!
The full library of amp-components can be found here. Keep in mind that not all are available in AMP HTML email and more testing and specific amp4email documentation is constantly evolving and should be available soon. Our friends at amp.dev provided a few handy tables that I’ve taken the liberty of building out further, for your creative development pleasure. Some confirmed components are listed below.
Layout components available in AMP HTML email:
| Component | Description | Possible Uses |
| <amp-carousel> | Adding content on a horizontal axis. | Image galleries, carousels with information pulled in with <amp-list> |
| <amp-image-lightbox> and <amp-lightbox> | Introducing a lightbox to email. | Highlighting specific images, showing results of interactive or dynamic content. |
| <amp-timeago> | Render a timestamp. | Built-in countdown timer! |
| <amp-fit-text> | Fit text to a certain area. | Making responsive text in a container. |
| <amp-accordion> | Show and hide content. | Menus, product information, reveal a voucher code. |
Dynamic components available in AMP HTML email:
| Component | Description | Possible Uses |
| <amp-form> | Including forms in email using the action-xhr attribute (on the same domain as the sender address). To render a response, you can also use <template type=”amp-mustache”> | Including quizzes, surveys, reviews and collecting information. Also in the realm of possibility is creating complex forms for booking or buying within email. |
| <amp-selector> | Add the ability to select multiple options in a form. | Check out SparkPost’s demo of <amp-selector> and <amp-form> for an in-email preference centre. |
| <amp-list> | In conjunction with <amp-mustache> you can pull JSON data into an email. | Pulling in the latest products in an online store, travel data, deals. |
| <template type=”amp-mustache”> | Using this template markup, you can format data fetched within an <amp-list> or responses to forms. | Quiz answers, formatting lists. |
| <amp-bind> | Using script within email. | Your only limit is your imagination. |
| <amp-state> | Defaults for <amp-bind> | Setting up the start of an interactive adventure with <amp-bind> |
Media components available in AMP HTML email
| Component | Description | Possible Uses |
| <amp-img> | AMP version of an <img> tag. Note: Binding to [src] is not allowed. | All static images in an email. |
| <amp-anim> | Add gifs into emails. Note: Binding to [src] is still not allowed. | Adding all kinds of moving images into email. Here are some cool gif ideas for email. |
Testing Your AMP HTML
Good news: with the AMP HTML email framework, email testing should become more standardised across email clients. The design of the components allow them to work in supporting email clients. However, there will still be differing levels of CSS support and eccentricities within each client, so testing remains a crucial step.
Email on Acid is working on complete testing for AMP emails as well, ensuring your code is valid and will render seamlessly across clients. Get excited.
Until you get up and running with your AMP efforts, QA your emails with Campaign Precheck, which reviews your preheader text, accessibility (especially for the visually-impaired), URL and image validation, comprehensive spell check, and a finished report card letting you know what you might’ve missed or if your email is pixel-perfect.
In a nutshell, Campaign Precheck ensures you’re not leaving any money on the table via a broken email, inaccessible content, misspellings that can turn a customer off, or a questionable inbox first impression (looking at you, preheader text).
Once you do have AMP code to test, the AMP HTML Email Validator tool will make sure your AMP code is playing by the rules for proper rendering. If it catches any rule breakers, it will alert you.
Common errors can include:
It cannot recognise your ESP code:

The relevant base components are missing:

Invalid URL protocol ‘http:’ – within AMP, URLs need to be ‘https:’

Let us know how you get on building AMP HTML emails. Join the emailgeeks.slack.com #email-code-amp channel and share any you see in the wild, or even your own creations.