Email Deliverability
What is DKIM for Email Authentication and How Does it Work?

There are hundreds of millions of email phishing attacks every year. Some of those fraudulent emails could be from scammers and spammers who are trying to impersonate your brand. And those attacks are becoming more sophisticated. So, what can senders do to help stop it?
The best way to prevent this from happening to your subscribers? Set up rigorous email authentication protocols: SPF, BIMI, DMARC, and DKIM.
Of these four email authentication standards, only one comes with a super-secret, encrypted digital key. That’s DomainKeys Identified Mail, or DKIM for short. A DKIM signature helps mailbox providers verify you as the sender while preventing phishing attacks known as email spoofing.
Imagine signing an important letter with invisible ink, which makes it clear the message came from you and no one else. That’s essentially what DKIM does. Of course, it’s not quite that simple. Here’s how DKIM works, and what you need to know to implement it for your email marketing program:
What is a DKIM signature?
DKIM, or DomainKeys Identified Mail, is an email authentication protocol that creates a digital signature that mailbox providers use to verify the identity of an email sender. A mailbox provider connects the DKIM signature, found in an email’s header, with records published on the domain name server (DNS) of a sender’s domain. This provides an encrypted key to help mailbox providers detect forged sender addresses. All major mailbox providers look for DKIM signatures when authenticating emails, including Google, Apple Mail, and Outlook.
Created in 2004, DKIM combined two methods designed to prevent email forgery: Yahoo’s “DomainKeys” and Cisco’s “Identified Internet Mail.” The DomainKeys portion was designed to verify the DNS domain of an email sender. Identified Internet Mail is the digital signature portion of the specification.
DKIM adds another layer of protection to the standard practice of SMTP, or Simple Mail Transfer Protocol. While SMTP is frequently used, it doesn’t include a way to verify a sender before delivering an email. That made it possible for spammers and scammers to fill inboxes with junk and attempt to spoof trustworthy brands.
What does DKIM do and how does it work?
Essentially, when you set up a DKIM, you’re telling internet service providers (ISPs) that your ESP is sending mail from an authorized system and that it is not spam or spoofing. Like other email authentication methods, DKIM lets senders associate a specific domain with their email messages. Records published on the DNS vouch for an email’s authenticity.
However, DKIM has a unique way of doing this with an encrypted digital signature:
- A public DKIM key gets published on the DNS txt record.
- A private DKIM key is included inside a hash (string of characters) that’s generated on the sender’s side.
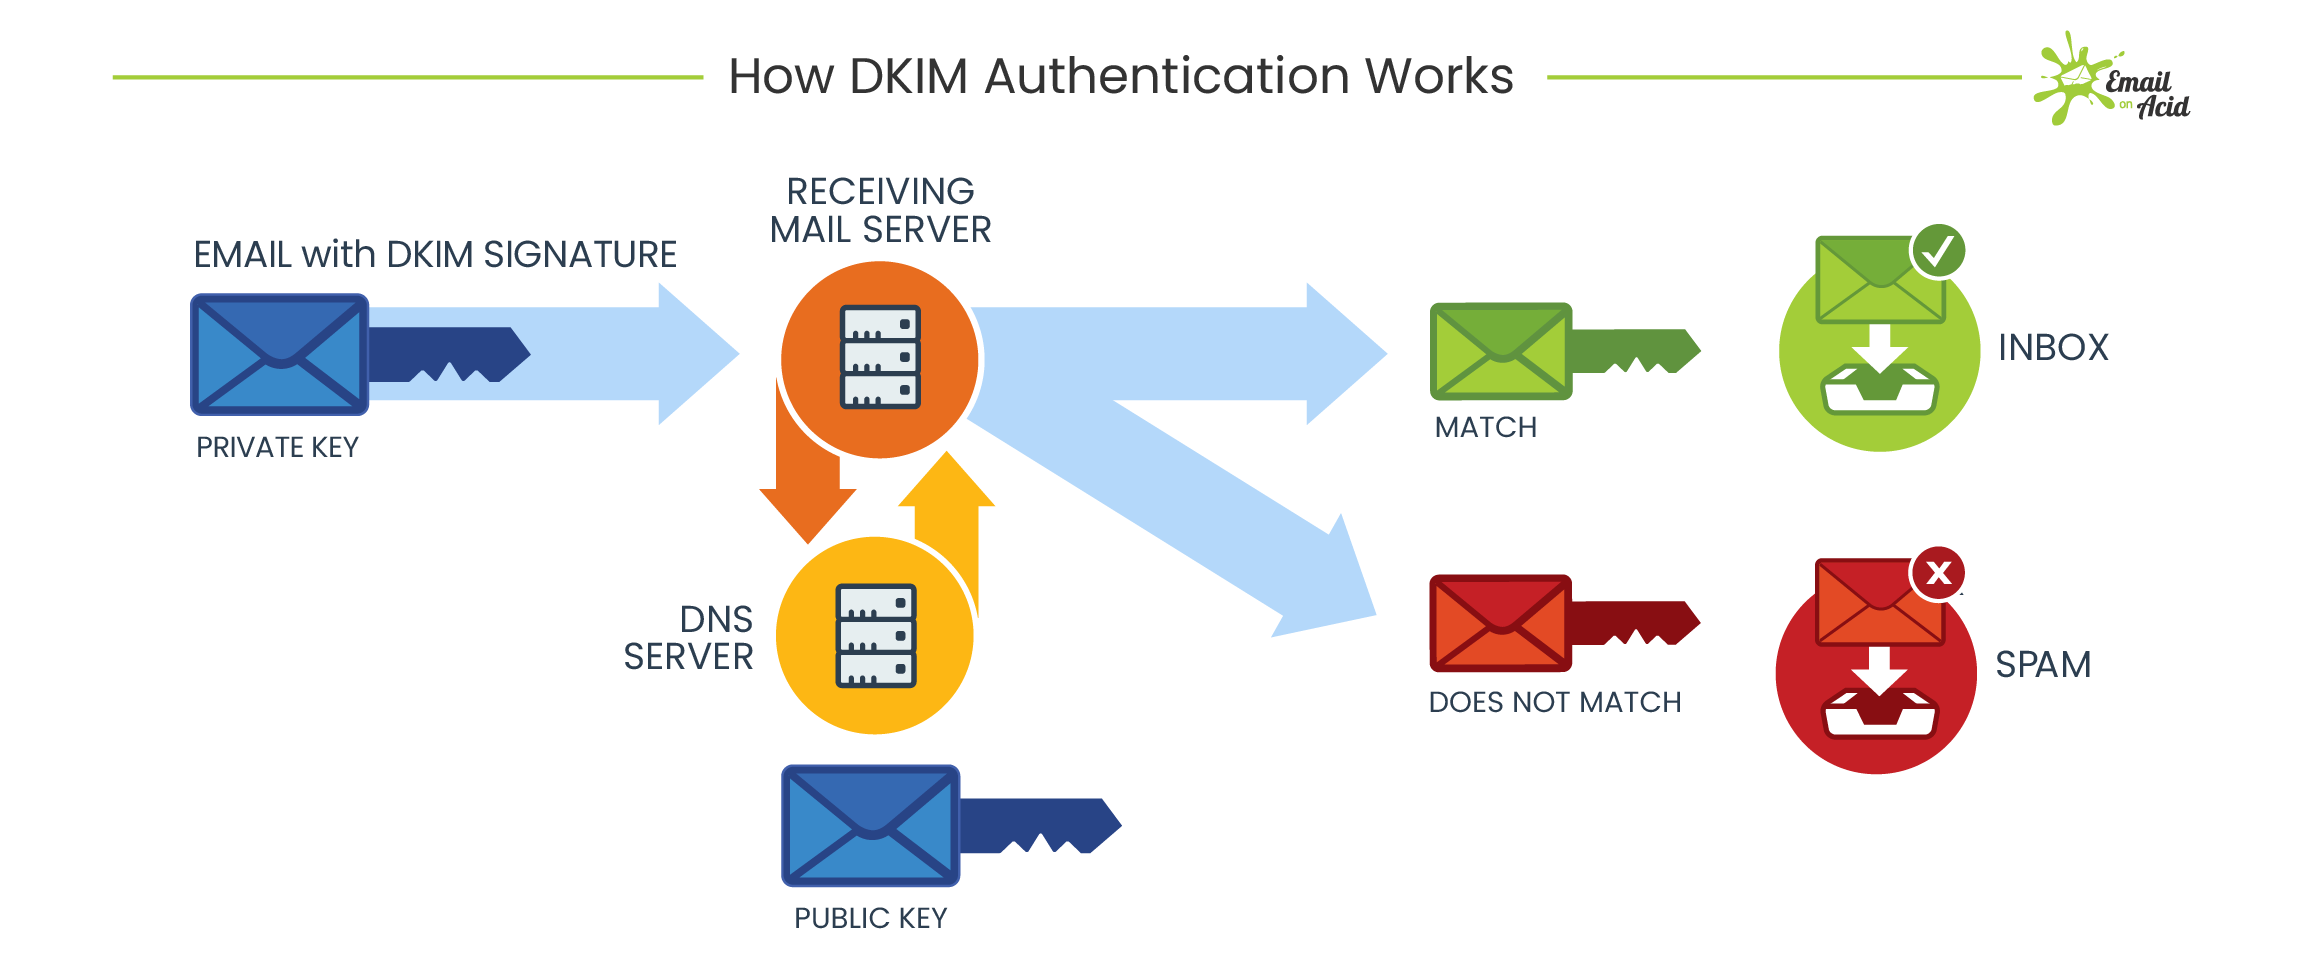
That hash then gets encrypted with the private key and placed in the email header. Private DKIM keys are unique to the sender and match the public key in the DKIM TXT record on the DNS.
When the two DKIM keys match, mailbox providers can verify the identity of the sender and the message goes through to the inbox. If the key pair does not match, or if there is no DKIM signature detected by the email provider, it’s more likely that the email will be rejected or filtered into the spam folder.
DKIM itself does not filter emails. However, it helps the receiving mail servers decide how to best filter incoming messages. A successful DKIM verification often means a reduced spam score for a message.
That’s why setting up DKIM authentication is so important for email deliverability — without this and other authentication protocols that confirm your email security, providers like Gmail won’t deliver emails that appear to come from a brand like Microsoft, PayPal, or Bank of America, because scammers regularly use these kinds of brands for email spoofing.
A DKIM signature vs. SPF authentication
What’s the difference between a DKIM signature and SPF authentication? These two protocols are simply two different ways to authenticate senders and prevent email spoofing, but a strong email security program uses both.
- A DKIM signature uses keys to authenticate a sender, matching the private key in the individual email with the known public key from that sender in the DNS record
- An SPF record, or sender policy framework, contains an official list of domains and servers authorized to send email on behalf of a particular domain, including your email service provider (ESP) and the domain owner. That could include
yourname@example.com, but alsohello@example.com,customersupport@example.com, and so on. If a domain that’s not in your SPF tries to send email from your brand, mailbox providers may reject it or send it to the junk folder.
Both SPF and DKIM have strengths and weaknesses. For example, a downside of SPF is that it breaks during email forwarding, but the DKIM signature does not. A DKIM signature can be faked, however, which is why it’s best practice to change or rotate your keys on a consistent basis – at least once or twice per year.
Adding DMARC to the mix
Once you have DKIM and SPF in place, a DMARC policy tells mailbox providers what to do with emails that fail authentication. This policy, also known as Domain-based Message Authentication, Reporting, and Conformance, checks for DKIM and SPF alignment, creating a common framework for mailbox providers to use in the DNS record. For example, if an email fails one or the other (there are various reasons this might occur), DMARC makes it more clear for a mailbox provider to know what to
For many people, missing an important, legitimate email is even worse than letting spam get through to their inbox. Real emails can sometimes fail DKIM and SPF authentication for various reasons. So, mailbox providers may let emails through if they don’t pass the test but appear to come from a legit sending domain. DMARC makes it more clear what to do.
What does a DKIM record look like?
Implementing a DKIM signature requires making changes to the code in your email header and adding a txt record to your domain name system (DNS) server. Here’s a closer look at those two pieces:
The DKIM record
In order to take advantage of DKIM to protect your brand from spoofing and protect your subscribers from scammers, you’ll need to create a DKIM record and place it on your DNS txt record and publish it on the domain name server. This may involve getting some help from the IT department and/or your email service provider (ESP). Here’s an example of a DNS record:
                                dk1024-2012._domainkey.example.com TXT "v=DKIM1; t=y; k=rsa;
p=MIGfMA0GCSqGSiuTHjQWercnvEr54A2CA;"
Here’s a breakdown of the sample DNS TXT record for a DKIM signature:
• v= The version of the protocol used
• t= This optional tag indicates the sending domain is testing DKIM
• k= The key type, which is usually rsa
• p= The public key, which pairs with the encrypted DKIM signature
The only required tag in the DNS record is the public key (p=). The DKIM record also includes the sending domain and the DKIM selector, the latter of which is a name or number the sender uses to tell receiving mail servers where to find the private key. The DKIM signature header gets added to email messages and includes the information receiving mail servers need to verify the authenticity of a message.
How to read a DKIM header
Then, you need to create the DKIM header, which is the code inserted into the header of every single email you send, and which is what contains the public key.
These two pieces together make up the DKIM signature.
Let’s put it all together. Here’s an example DKIM signature (recorded as an RFC2822 header field) for the signed message:
                                DKIM-Signature a=rsa-sha1; q=dns;

d=example.com;

i=user@eng.example.com;

s=jun2005.eng; c=relaxed/simple;

t=1117574938; x=1118006938;

h=from:to:subject:date;

b=dzdVyOfAKCdLXdJOc9G2q8LoXSlEniSb

av+yuU4zGeeruD00lszZVoG4ZHRNiYzR
Tags in a DKIM signature header
- b = the actual digital signature of the contents (headers and body) of the mail message
- bh = the body hash
- d = the signing domain
- s = the selector
- v = the version
- a = the signing algorithm
- c = the canonicalization algorithm(s) for header and body
- q = the default query method
- l = the length of the canonicalized part of the body that has been signed
- t = the signature timestamp
- x = the expire time
- h = the list of signed header fields, repeated for fields that occur multiple times
NOTE: Tags above that are emphasized are required. DKIM signatures that are missing these tags will produce an error during verification.
We can see from this DKIM header that:
- The digital signature is dzdVyOfAKCdLXdJOc9G2q8LoXSlEniSbav+yuU4zGeeruD00lszZVoG4ZHRNiYzR.
This signature is matched with the one stored at the sender’s domain. - The body hash is not listed.
- The signing domain is example.com.
This is the domain that sent (and signed) the message. - The selector is jun2005.eng.
- The version is not listed.
- The signing algorithm is rsa-sha1.
This is the algorithm used to generate the signature. - The canonicalization algorithm(s) for header and body are relaxed/simple.
- The default query method is DNS.
This is the method used to look up the key on the signing domain. - The length of the canonicalized part of the body that has been signed is not listed.
The signing domain can generate a key based on the entire body or only some portion of it. That portion would be listed here. - The signature timestamp is 1117574938.
This is when it was signed. - The expire time is 1118006938.
Because an already signed email can be reused to “fake” the signature, signatures are set to expire. - The list of signed header fields includes from:to:subject:date.
This is the list of fields that have been “signed” to verify that they have not been modified.
One important consideration for DKIM authentication is the need to periodically change or rotate your DKIM keys. Just like updating a password for account login, DKIM key rotation helps keep the authentication protocol secure. In some cases, DKIM information is accidentally exposed, which could cause security concerns.
How do you set up and check DKIM?
DKIM setup is one of the most technical aspects of email deliverability and can require help from your web host providers, email service providers, or your IT department to configure it correctly. However, there’s good news — it’s much easier to verify your DKIM keys than it is to set them up in the first place. And trust us, doing this work goes a long way toward helping your email deliverability.
The particulars of your DKIM setup vary based on your hosting provider, so be sure to contact them for specifics. Take a look at these common provider documents for more details:
How to verify a DKIM signature
DNS records and DKIM signatures can get complicated. If you want to be sure your email authentication protocols are set up correctly, there are online tools that can help verify that.
Here are a few tools to try for DKIM verification:
- DKIM record Checker – DMARC Analyzer
- DomainKeys Identified Mail (DKIM) Record Lookup – MxToolBox
- DKIM Record Checker – DKIM tools – EasyDMARC
- DKIM Inspector – Dmarcian
- Free DKIM Record Checker – DMARCLY
- DKIM Record Lookup – DNS Checker
- DKIM Record Check – DMARC Analyzer – Mimecast
You can also test DKIM by sending an email to a Gmail account. Open the email in the Gmail web app, click on the down arrow next to the “reply” button (top right of email), and select “show original.” In the original, if you see “signed-by: your domain name” then your DKIM signature is good.
Does DKIM improve deliverability?
Like most things in email, the answer is “it depends.”
Yes, adding DKIM authentication (and SPF, for that matter) improves your overall sender reputation and can make it much more likely for providers to send your email to the inbox. But the case for using DKIM is more about what happens if you fail to use it. Without it, you’re much more likely to get flagged as spam — and of course, it’s a lot easier for scammers to spoof your emails, which negatively impacts not just your deliverability but your brand trust, too.
Take control of email deliverability
Strong authentication is the foundation of great email deliverability. Making sure you have your authentication protocols in place is essential — but it’s not a fail-safe. Deliverability is a notoriously fickle aspect of email marketing that requires constant upkeep. That’s why Sinch offers Mailgun Optimize, a suite of deliverability tools and services that help take the complexity out of email deliverability. That means more of your awesome emails will make it to the inboxes of people you want to reach.