Email Development
How to Code Interactive Images in Your Emails to Highlight Your Content
Flashy, eye-catching graphics – social media has trained us to have a short attention span, but how can you capitalize on this in your email campaigns? After all, as a marketer, you’re always looking for a better way to highlight email content and engage your readers. Well, we’ve got two words for you: interactive emails.
By using interactive images with hover and scrolling effects or by adding animated GIFs, accordions, countdown timers, and carousels, you can design content to snag your readers’ attention to increase engagement and boost conversion rates and click-through rates.
Not sure where to get started? We’ve got you. We’ll explain why you should use interactive images and how to code interactive elements in emails.
Why use interactive images in email?
If an image is worth a thousand words, how much is an interactive image worth? While this isn’t exactly quantifiable, here are some reasons to include interactive email content in your next email marketing campaign:
- Boost engagement. Use interactive elements to enable readers to input information into forms, scroll, and browse without leaving their inbox. By reducing friction in the user experience, you encourage your subscribers to engage more with your content.
- Increase conversions. By increasing engagement, you’ll increase your conversion rate. Readers are more likely to click through to your landing page if they find your email engaging.
- Stand out from the crowd. We all know inboxes are crowded, and just because your subject line convinced readers to open your email doesn’t mean they’re going to click through to your website. Interactive images catch and hold your reader’s attention, encouraging engagement and click-throughs.
Four ways to code interactive images in your email designs
Now that we’ve covered “why,” let’s get cracking on the “how.” This section details four different ways to code interactive content into your emails, including:
- Adding hover animations
- Creating side-scrolling images
- Designing image carousels
- Embedding animated GIFs
You’ll need a working knowledge of Hypertext Markup Language (HTML) and Cascading Style Sheets (CSS) for the following subsections. Need a refresher? Check out our article on the basics of email development.
Without further ado, let’s dive in!
1. Add hover animations
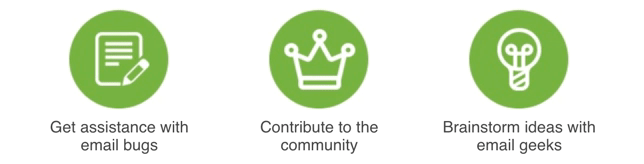
Let’s learn how to add a hover effect to an image in your email. Let’s start with this graphic:
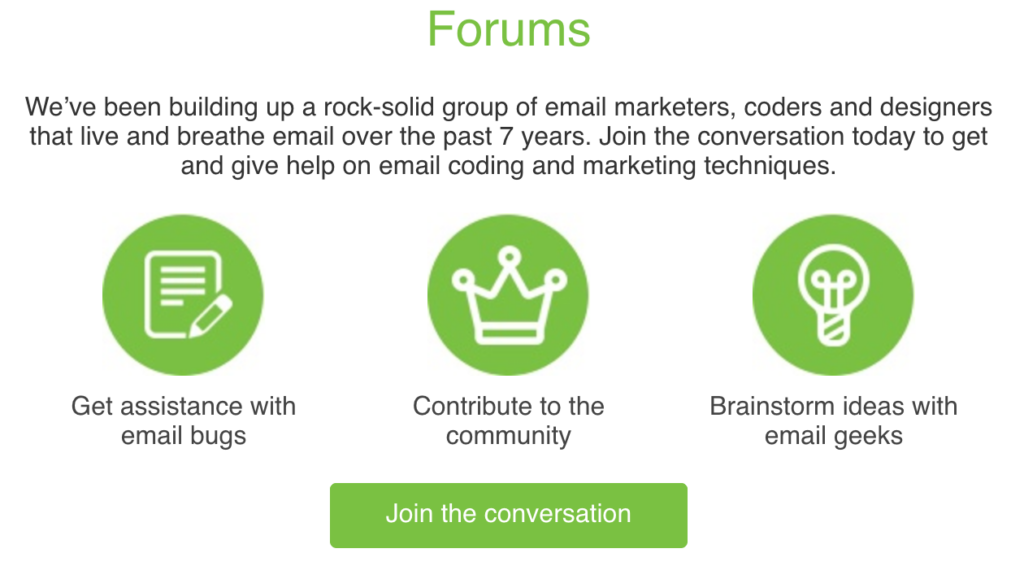
It looks nice. But we can do better. With a little coding, we can make it interactive. We want our icons to invert colors when subscribers hover over them, like this:
Although this may look complicated, the implementation is fairly simple. Check out the following code snippet:
                                <table width="100" cellspacing="0" cellpadding="0" border="0">
	<tr>
		<td id="iconArea1BG">
			<img src="images/icon1-2.jpg" width="100" style="border-width:0;width:100%;max-width:100px;height:auto;" id="iconArea1">
		</td>
	</tr>
</table>
All three icons are coded in the same way. We use a table <table> and a cell <td> to contain the image. You’ll notice the cell has a class of iconArea1BG and the image itself has an id of iconArea1.
The next step is adding some CSS to the <style> section in the <head> to handle the hover effect. We’ll need to reference both the class and id mentioned. The following code switches an image from full opacity to zero opacity when your reader hovers over it:
                                #iconArea1:hover {
	opacity: 0;
	transition:  all 0.3s linear;
}
Next, we want to add the following code to the CSS in the <style> section that handles the class of iconArea1BG. With this snippet, we’ll add a background image to the cell with the icon in it:
                                #iconArea1BG {
	background-image: url(images/icon1-1.jpg);
	background-repeat: no-repeat;

}
By adding these two pieces of CSS to the email, we stipulate when someone hovers over our image, it’ll become transparent. And when our image becomes transparent, the background image hidden behind it becomes visible.
Whenever you use images in emails, it’s important to set fallbacks in case certain email clients don’t render your images. In terms of fallbacks, this piece of code works itself out. For any email clients that don’t support the :hover functionality, they’ll simply see the standard icons. One way to avoid images being rendered incorrectly (or not at all) is adding a “view in browser” option to ensure your email appears exactly how you intended.
2. Create side-scrolling images
If you have many images or products you want to showcase, a side-scrolling image might be just the type of interactive content you need. This section, will cover how to code a side-scrolling image like this into your HTML email template.
To achieve this, we’ll create a wide image consisting of all the images we want to display, stitched together horizontally. (In this example, we’ve stitched together a preview images of several Email on Acid’s templates.) Then, set this side image as the background image and set it to scroll sideways.
First off, let’s create a fallback option in case a particular email client doesn’t render background images. In other words, we’ll create a table containing an image inside a <div> with the class of fallback. Check it out:
                                <div class="fallback">
	<table width="100%" class="max-width:600px !important;" border="0" cellspacing="0" cellpadding="0" class="100p">
		<tr>
			<td><img src="images/fallback.jpg" border="0" style="display:block;max-width:600px;" width="100%">
			</td>
		</tr>
	</table>
</div>
Next, add a CSS snippet to the <style> section of the <head> to define when to show or hide the fallback div. Specifically, we want to hide this section if an email client renders the interactive side-scrolling image. Here’s what to do:
                                @media screen and (-webkit-min-device-pixel-ratio: 0) {
    .fallback {
        display:none;
        display:none!important;
        max-height:0;
        overflow:hidden;
    }
    .interactive{
        display:block!important;
        max-height:none!important;
    }
}
Now we’ve created an active fallback, so let’s code our side-scrolling image:
                                <div class="interactive" style="display:none;max-height:0;overflow:hidden;">
	<table width="100%" class="max-width:600px !important;" border="0" cellspacing="0" cellpadding="0" class="100p">
    	<tr>
    		<td id="animate-area2" background="images/scroller.jpg" style="font-size: 0px; line-height: 0px; background:url(images/scroller.jpg) 0% 0% / cover; background-size: cover;" bgcolor="#7ac142" width="100%" valign="top">
    			<!--[if gte mso 9]>
				<v:rect xmlns:v="urn:schemas-microsoft-com:vml" fill="true" stroke="false" style="width:120px;height:300px;">
				<v:fill type="tile" src="images/scroller.jpg" color="#7ac142" />
				<v:textbox inset="0,0,0,0">
				<![endif]-->
				<div>
					<img src="images/trans.png" width="100%" style="max-width:600px;">
		        </div>
				<!--[if gte mso 9]>
				</v:textbox>
				</v:rect>
				<![endif]-->
			</td>
		</tr>
	</table>
</div>
There’s a lot going on here, but we’ll break it down bit by bit! We’ll start with the div containing all of the content. This div is set to hide by default, but we’ve reversed it in the embedded CSS snippet for email clients that can render it.
Next, we’ll use Visual Markup Language (VML) to ensure our background image renders on Microsoft Outlook.We also have to include a transparent PNG with the width and height of the whole area to ensure we can still see the entire background image when we’re scaling the size of the email.
We also have an id set on the table cell of animate-area2. This is how we handle the animation of the section. We’ll add this CSS to the <head> section as well:
                                #animate-area2   {
    width:650px;
    background-image: url(images/scroller.jpg);
    background-position: 0px 0px;
    background-repeat: repeat-x;

    animation: animatedBackground 45s linear infinite;
    -moz-animation: animatedBackground 45s linear infinite;
    -webkit-animation: animatedBackground 45s linear infinite;
}

@keyframes animatedBackground {
    0% { background-position: 2400px 0; }
    100% { background-position: 0 0; }
}
@-moz-keyframes animatedBackground {
    0% { background-position: 2400px 0; }
    100% { background-position: 0 0; }
}
@-webkit-keyframes animatedBackground {
    0% { background-position: 2400px 0; }
    100% { background-position: 0 0; }
}
With this code, our animation, animatedBackground, will move from its original position along the x-axis 2400 pixels to a new position. Since the image’s width is 2400 px, this creates a scrolling effect. Set the animation to infinite to create a continuous scrolling effect.
And we’re almost done! We’ll add a final piece of interaction to let our reader pause the animation through hovering. This way, it’s easy to read the text contained in our images. Do this by adding a :hover style like this:
                                #animate-area2:hover {
	-webkit-animation-play-state: paused;
	-moz-animation-play-state: paused;
	-o-animation-play-state: paused;
	animation-play-state: paused;
}
3. Design image carousels
Looking for a different way to showcase many images? Try using an image carousel. In this section, we’ve used a series of images of speakers from an Email on Acid meetup to create an image carousel. We also added captions to display the speaker’s name and their presentation title:
Check out the code for this kind of image carousel in a tutorial from email developer, Justin Khoo.
One thing to note is Gmail doesn’t support attribute selectors. Unfortunately, image carousels don’t work within Gmail.
4. Embed animated GIFs
Animated GIFs have long been a staple of the email marketing industry. They’re incredibly robust and have solid support in most email clients. They’re also a quick way to add interactive content to your email design.
Check out our other article to learn more about using GIFs in your emails.
Wrapping up
And that’s it. Do you have examples of interactive email that highlights content well? Let us know in the comment section below. Or, if you’re interested in other ways to add interactivity to your emails, check out our article on AMP for email.
With any email campaign, interactive or not, one of the most important parts of the process is testing. A broken email campaign will cost you in ROI and brand image. We’ve got you covered with our email testing in over 55 different email clients. Try Email on Acid free for seven days.
This article was updated on October 24, 2022. It was first published in November of 2016.


