Email Development
[Code Tutorial] How to build an Interactive Puzzle in Email
![Image for [Code Tutorial] How to build an Interactive Puzzle in Email](https://www.emailonacid.com/wp-content/uploads/2016/12/EOA-1216_PuzzleEmail.jpg)
![[Code Tutorial] How to build an Interactive Puzzle in Email](https://www.emailonacid.com/wp-content/uploads/2016/12/eoa-anim-600.gif)
We sent out an interactive email promotion this week featuring a combination lock that got a lot of attention. The email was interactive in the majority of the Webkit email clients such as the iPhone, iPad and Apple Mail email clients. Recipients on other email clients saw a static image that linked to the Web version of the interactive email. Before we dive into how the email was implemented check out the live version of the email: Live version of the email.
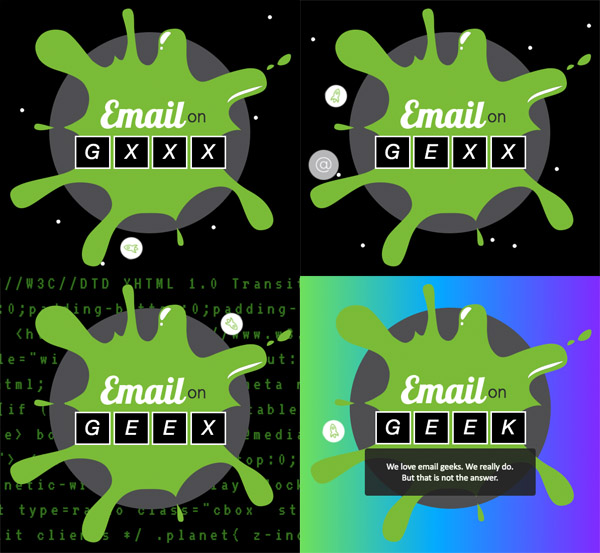
Combination Puzzle
You might have seen those word combination locks like the Wordlock bicycle lock. I thought it would be cool to implement such a scheme in an email that allows the recipient to “unlock” an offer. In the email, a Call To Action link is displayed that takes the recipient to a landing page with a coupon once the recipient sets the four letter combination to “ACID”.
The implementation for such a scheme is pretty straightforward: Four containers – each with four labels that target a unique radio input element. For each box, only one label would be visible at a time and clicking or tapping the label would toggle its radio input that will cause the next label to be displayed. The following animation shows the state of the radio elements as each label is clicked.

The CSS to display the label keyed to a particular radio element is below:
                                label{
  display:none;
}
#key1a:checked ~ .kinetic .box1 label:nth-child(2){
    display:block;
  }
 #key1b:checked ~ .kinetic .box1 label:nth-child(3){
    display:block;
  }
 #key1c:checked ~ .kinetic .box1 label:nth-child(4){
    display:block;
  }
 #key1d:checked ~ .kinetic .box1 label:nth-child(1){
    display:block;
 }
View the live version of the code above here. The following graphic shows the state of the radio elements when the recipient has successfully solved the code.

The winning call to action button is initially hidden and only displayed when the right combination has been selected. In this case, the code looks like the example below:
                                #key1c:checked ~ #key2b:checked ~ #key3c:checked ~ #key4b:checked ~ .kinetic .win-wrapper{
  display:block;
}
In the actual example, I added a blocker layer that appears above the letters to prevent the recipient from continuing to play with the code once the correct code is displayed. After all, the goal is to get the recipient to actually click on the call to action! The email also contains easter egg hints. When the recipient uncovers words that aren’t the solution, such as the combination of “G E E K,” these hints are implemented the same way.
Switching Background Scenes
To make the email more interesting, the background of the email changes as the recipient clicks on more boxes. We want the background to change based on the number of boxes changed from its original state, but not in any particular order. This is done by using the using the venerable attribute selector. In our example, the “default” key is “X” in each of the four boxes and they are displayed when the radio elements with the ids that end with ‘d’ (key1d, key2d, key3d, key4d) are checked. So, an attribute selector like the one below will cause an element to be displayed when one box has been changed (i.e. three boxes are still in their default position).
                                input[id$=d]:checked ~ input[id$=d]:checked ~ input[id$=d]:checked ~ .kinetic  .foo{
    display:block;
 }
However, the above CSS will also be active when all four boxes are in their default position. So, we need to add a selector to specifically hide the element when four boxes are in their default position.
                                input[id$=d]:checked ~ input[id$=d]:checked ~ input[id$=d]:checked ~ input[id$=d]:checked ~ .kinetic  .foo{
    display:none;
 }
You can dive into the source of the code to see how each scene is implemented. When chaining CSS selectors, you should familiarize yourself with CSS specificity rules and this article on CSS Tricks has a good primer on it.
Fallback
Although the email can be somewhat “hacked” to support a broader range of email clients, we made the decision to only support Webkit based email clients that support the :checked CSS selector. The email by default displays a fallback image with a link to the Web version so recipients who aren’t on a Webkit client can experience the puzzle on a regular browser. Then the following code is added to display the interactive content in Webkit clients that support checkboxes.
                                @media screen and (-webkit-min-device-pixel-ratio: 0) {
        .cbox:checked + .fallback-wrapper {
            display:none!important;
        }
        .cbox:checked + .kinetic-wrapper{
            display:block!important;
            max-height:none !important;
        }
        /*
        Selective blocking for clients.
        - Samsung (#MessageViewBody) - no absolute positioning
        - Comcast/Zimbra (body.MsgBody) - inconsistent CSS support
        - Add .cbox to ensure CSS specificity weight exceeds earlier block
        */
        #MessageViewBody .cbox + .fallback-wrapper,
        body.MsgBody .cbox + .fallback-wrapper{
          display:block!important;
        }
        #MessageViewBody .cbox + .kinetic-wrapper,
        body.MsgBody .cbox + .kinetic-wrapper{
          display:none !important;
        }
    }
Read this article for more interactive email fallback strategies.
Other Goodies
There are too many techniques used in this email to list in this article, so I’ve added comments in the source to help bring some light into how some of the techniques are implemented. Feel free to download the code and take it apart. Live version of the email As usual, when creating interactive email campaigns, testing on all the major email clients is super important to the success of your campaign. Get unlimited email and image testing, free for 7 days, so you can send with 100% confidence.


