Email Development
Tutorial: How to Code Your Own Editable Mailchimp Email Templates

A lot of people use Mailchimp for email marketing. The marketing platform, which began as an email service provider (ESP) back in 2001, has millions of users. And it’s popular with both small businesses and entrepreneurs as well as larger companies. So, whether it’s for an employer or a client, there’s a good chance you’ll work with Mailchimp at some point in your email marketing career.
To get the most out of the platform, email developers can learn to build Mailchimp templates that others can easily edit and customize for different campaigns.
Earlier in my days as an email developer, I worked with Mailchimp all the time. The platform does have its own templating language. But it’s pretty easy to get the hang of it. If you already know how to code basic HTML emails, all you need to do for Mailchimp templates is add some attributes in key places to make things editable and you’re off and running.
In this developer tutorial, we’ll show you how to build a Mailchimp template for a single-column email that includes a full-width image, a block of text, and a button. You can get a lot of mileage out of a simple template like that. And you’ll learn how to code it in four easy steps.
Why create your own Mailchimp templates?
If you’re working as a freelance email developer or at a digital agency, learning how to code responsive Mailchimp email templates is a smart move. So is learning email frameworks like the Mailjet Markup Language (MJML). The goal of this continuous learning is to diversify your skillset as a coder of emails.
Like many other ESP platforms, Mailchimp has a lot of its own pre-built templates that its users can choose from. If you need something super quick and extra easy, that’s always an option. These pre-made templates let non-coders quickly do things like add a logo or adjust fonts and colors.
However, if you want to take complete control of design and layout, coding your own Mailchimp templates lets you bring unique ideas to life while sticking to your brand’s style guidelines and avoiding the pitfall of email designs that look similar to other brands’ campaigns.
Mailchimp currently has two email builders to choose from: the Classic Builder and the New Builder. Both options have drag-and-drop capabilities. However, you’ll need to use the Classic Builder if you want to code your own Mailchimp template. Once that’s done, others can use your editable template.
Common Mailchimp email template attributes
As mentioned, Mailchimp has its own templating language. That includes basic attributes for editable areas of an email. Each of these content sections begins with mc:edit=. I suggest using Mailchimp’s conventional names because it keeps things clear and consistent. Plus, if you switch templates and your naming conventions match, the content will repopulate.
Here are some of the most common naming conventions:
mc:edit="header"– for coding email header sectionsmc:edit="footer"– for email footersmc:edit="header_image"– for the section with you hero image or main visualmc:edit="body"– for the section including your main body copymc:edit= "sidecolumn"– for right or left columns
There’s also mc:hideable, which gives you and others the ability to hide or remove elements from the template. And there’s mc:repeatable, which makes it easy to duplicate blocks or elements in the email.
In this tutorial, we’re keeping it simple with a single-column email. And simple doesn’t mean uncool. One-column emails are a good way to start taking a mobile-first approach to email design.
One thing to keep in mind about these attributes… Mailchimp says you should avoid nesting editable elements inside of other editable content areas. Otherwise, things could get messy and confusing.
Four steps to build your own Mailchimp templates
Before we dive in, I should mention that I am not using <div>s in this example. It’s built with tables and rows instead to make it easier to keep track of everything. Yes, this might bloat the code a little, but it shouldn’t be a major concern.
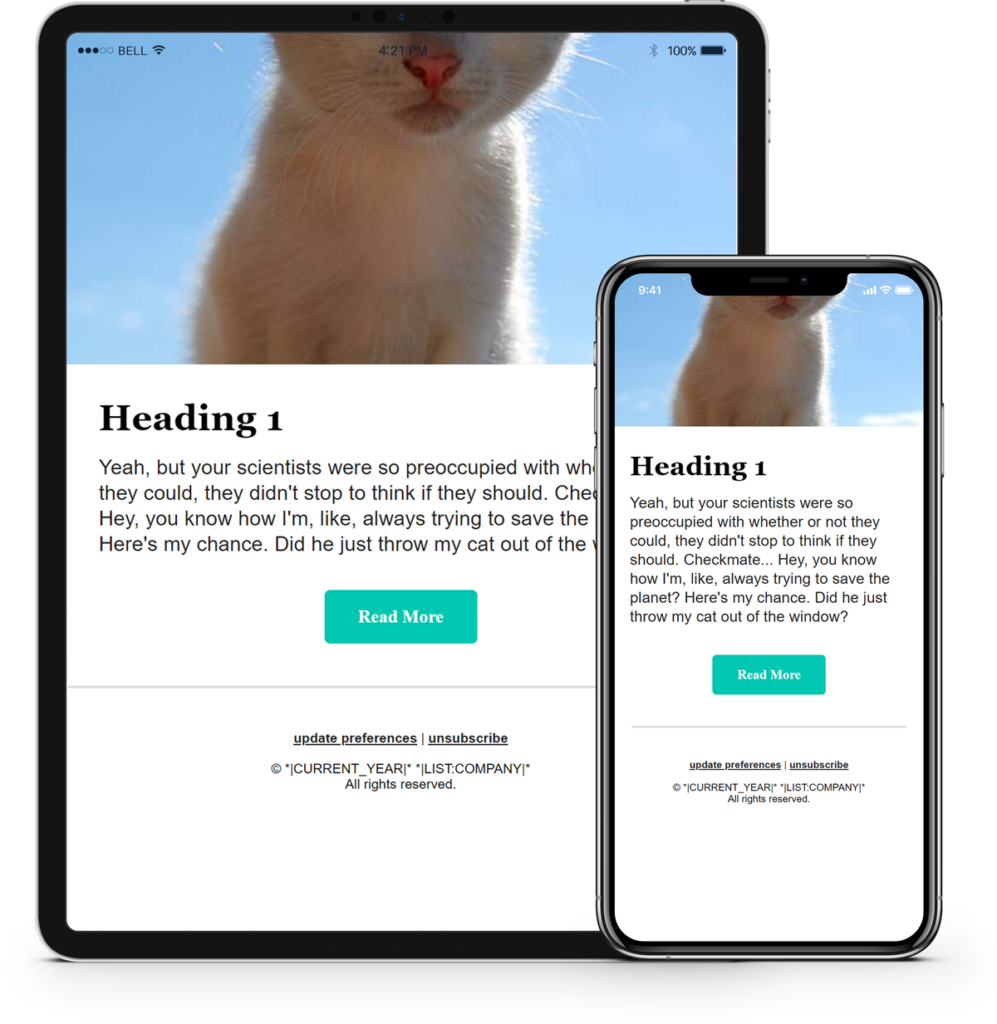
First, here’s a look at the email templated we’re going to build:
Here’s the complete code (which includes base code I grabbed from goodemailcode.com):
See the Pen Untitled by Kasey Steinbrinck (@kasey-steinbrinck) on CodePen.
Now, let’s break things down into the different elements of the email template.
Step 1: Making editable areas
To make it possible to edit sections of the email template once you’re done coding, you’ll need to add mc:edit to each of those elements. Keep in mind that any code you nest inside the container with the edit attribute will show in Mailchimp, which can get tricky. We’ll cover this more when we go over buttons.
Coding the image
When you want to add editable graphic blocks to Mailchimp templates, you’ll place the edit attribute within the <image> element. Here’s how it looks:
<img src="https://via.placeholder.com/600x300" width="600" mc:edit="image" style="max-width:600px; display:block;height:auto;" class="full-width" />
Important info about images: If you’re using high-resolution (2x) images for retina displays, you must set the size in Mailchimp’s image settings. If you don’t, the image will blow out to full-size in Outlook inboxes. To avoid this, simply set the image width and Mailchimp automatically calculates the right height.
Coding the text
Next, let’s look at how we add an editable section for the email copy:
                                <tr>
    <td mc:edit="body" align="left" class="mobile-padding-left mobile-padding-right mobile-padding-bottom" style="padding:15px 30px;" bgcolor="#ffffff">
        <h1>Heading 1</h1>
        <p>Yeah, but your scientists were so preoccupied with whether or not they could, they didn't stop to think if they should. Checkmate... Hey, you know how I'm, like, always trying to save the planet? Here's my chance. Did he just throw my cat out of the window?</p>
    </td>
</tr>
Coding the CTA button
As you can see, adding mc:edit="body" is the only thing that differs from basic HTML email coding. And it’s all you need to do to make an editable text block in Mailchimp templates. Don’t forget, using conventional names like “body” will make switching templates easier if needed.
Now let’s check out the code for the button link in our Mailchimp email template. This can get a little bit more complex. Sometimes, I’ve ended up having to use the source editor to wade through extra code and make some edits, because the button doesn’t display quite right. This could be challenging if you don’t have much HTML coding knowledge.
After some fiddling, this is the code I’ve come up with:
                                <tr>
    <td align="center" style="padding:15px 30px;" class="content-dark">
        <table role="presentation" width="100%" border="0" cellspacing="0" cellpadding="0">
            <tr>
                <td align="center" class="mso-padding" >
                    <table role="presentation" border="0" cellspacing="0" cellpadding="0">
                        <tr>
                            <td class="btn" align="center" style="border-radius:5px;-webkit-border-radius:5px; padding: 15px 30px;" bgcolor="#00C7B1" mc:edit="cta"> <a href="https://example.com/" style="color:#ffffff;text-decoration:none;">Read More</a> </td>
                        </tr>
                    </table>
                </td>
            </tr>
        </table>
    </td>
</tr>
The button has rounded corners everywhere but Outlook. I consider rounded corners a progressive enhancement. So, that doesn’t bother me.
Step 2: Making areas hideable
The ability to hide or remove certain elements from an email template can be very useful. For example, let’s say you’re sending out an email that doesn’t have any imagery or doesn’t need a CTA button because it’s only informational.
With Mailchimp templates, you can use the mc:hideable attribute. Add this to any element you want to keep hidden. For example, to hide the image, you would add mc:hideable on the <tr> to make it possible to hide the entire row:
                                <tr mc:hideable>,
    <td align="center" style="padding:0 0 15px 0;display:block;height:auto;">
        <img src="https://placekitten.com/600/300" width="600" mc:edit="hero" style="max-width:600px; display:block;height:auto;" class="full-width" />
    </td>
</tr>
When someone edits your Mailchimp template, they’ll need to hover over an element to hide it. But sometimes there’s a bit of a problem. The icon you click to hide the element is blocked, which makes it impossible to accomplish.
To fix this, add the following CSS in your <style> section:
                                /* MOVES THE HIDEABLE SECTION ICON TO THE LEFT OF THE DOCUMENT */
.tpl-hidewrap{
left:0 !important;
margin-top:20px !important;
display:block !important;
height:100px !important;
width:100px !important;
text-align:center;
}
This adds a strip across the section, which lets you click the hide icon without activating an editable block. Special thanks to Steven Hambleton for the CSS snippet here. For more on addressing this annoying little bug, check out Steven’s tutorial and learn how to change the icon and move it out of the way.
We’re getting close to completing our Mailchimp template. If you want to make the email footer design editable, be sure to add mc:edit=”footer”. But many times, the email footer contains legal information and links that you don’t want to be changed or broken. So, you may not want this section to be editable.
Another tip is to add *|UNSUB|* in the footer code. If you don’t, Mailchimp will add its own default footer and you’ll have two footers (Or feeters, maybe? No.)
<td align="center" style="padding-top:15px;font-family:Arial,sans-serif;font-size: 12px;" class="text-center mobile-stack mobile-center full-width"><a href="*|UPDATE_PROFILE|*" style="color:#222222;" class="white-text">update preferences</a> | <a href="*|UNSUB|*" style="color:#222222;" class="white-text">unsubscribe</a><br/>
Step 4: Testing your new Mailchimp template
Finally, before you start using your customizable Mailchimp templates, make sure you test them first. That way, you can be confident they will render correctly on all the most popular email clients and mobile devices.
By the way, make sure you’re testing and auditing all existing templates at least once a year. Email is always evolving. So, don’t take a “set it and forget it” approach to your templates.
The only way to know for sure that your template functions as expected is to review email previews before you start using it in live campaigns. And even after you’ve tested your editable template, you should still test every email campaign before you hit send, because you never know how changes could impact things like accessibility and dark mode display.
But don’t worry… if you’re using Email on Acid for quality assurance (QA), you can take advantage of unlimited testing. No matter what pricing plan you choose, you can test your emails as many times as needed.
Can you export Mailchimp email templates?
You can export editable email templates built inside of Mailchimp if needed. When exported, you’ll have an HTML file that you can work with inside your text editor of choice. That means you’ll also be able to use your custom-coded template in a different Mailchimp account.
However, Mailchimp says that if you export templates and then import them into a new Mailchimp account, you will lose drag-and-drop functionality. If that’s a problem, you can look into Mailchimp’s template sharing features instead.
Dive deeper into email design and development
Interested in learning more about how to improve the email production process by making things more efficient, faster, and consistent? I highly suggest exploring the idea of an email design system. Once you’ve got the basics down, find out how I used Parcel to take the Sinch Email design system to the next level with email components.
Finally, we have to mention that if you’re looking for an alternative to Mailchimp as your ESP, you can check out Sinch Mailjet. Compare Mailjet vs Mailchimp to learn more. Mailjet has an intuitive Email Editor, but it also lets you add your own code, including responsive designs built with MJML. Try it out with no obligations. Get started with Mailjet for free.


