Email Development
How to Adjust HTML Image Padding and Spacing in Emails

As an email marketer, there are few things more frustrating than pouring time and effort into crafting the perfect email campaign, only to find that the layout falls short of expectations.
You eagerly preview your meticulously designed email, and to your dismay, you discover two major issues that cause your frustration to skyrocket. First, the text seems to uncomfortably cling to the images, creating a cramped and cluttered appearance that leaves you questioning its professionalism. Second, the images themselves are packed tightly together, resulting in a chaotic jumble that hampers readability and fails to make the desired impact.
In this article, we will explore effective techniques to tackle these frustrations head-on. By implementing these strategies, you can tackle spacing around your images, conquer email clients-specific bugs, and ultimately have confidence in your email layout when you hit “send”.
Padding and margin are both CSS properties used to create space around HTML elements, but they have distinct purposes and behaviors, understanding the differences and how they work will help you decide the best way to add spacing around your images.
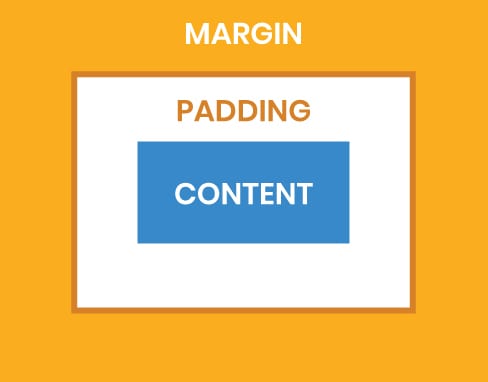
Padding and margin are two properties of the CSS box model which is simply a box that’s present on every HTML element.
Broken down into four parts, the box model contains the content which is our text and/or images, the padding which is spacing immediately outside the content but inside the border, the border which is a border encompassing the content and the padding, and finally the margin which is space outside of the border.
4 ways to add HTML image padding and spacing in email code
As with most things in email design and development there are numerous ways to achieve our goal. Below you’ll find the main ways of controlling padding and spacing around your images, how to implement them, and considerations for using them.
If you have any other great ways of nailing image spacing let us know in the comments!
One way to adjust image padding and spacing is by using inline padding directly within the HTML code.
For example, you can add a style attribute to the <img> tag and specify the desired padding values. Here’s an example:
<img src="image.jpg" alt="Description" style="padding-bottom: 20px; display: block; border: none;">
This code will add 20 pixels of space below your image tag. It’s important to remember that Outlook won’t respect padding placed on images and instead you’ll want to add the padding to the cell your image is in, like so:
                                <td align="left" style="padding-bottom: 20px;">
    <img src="image.jpg" alt="Description" style="display: block; border: none;">
</td>
A big advantage of using this method is that it allows you to very quickly adjust your spacing, as long as you’re being cognizant of Outlook’s rendering quirks when it comes to HTML image padding you’ll have no issues implementing this in your emails.
An alternative of HTML image padding would be to use margin. As we learned earlier, they largely achieve the same end result when it comes to spacing.
If you want to use margin rather than padding you can use it as seen below:
<img src="image.jpg" alt="Description" style="padding-bottom: 20px; display: block; border: none;">
There are a few caveats when using margin, notably that Outlook (surprise surprise!) has some funky interactions between margins and background colors.
It’s also very common in web development to utilize margins with negative values to control positioning of elements and create some clever layouts. Unfortunately that isn’t well supported in email clients with some of the major players such as Outlook, Gmail and iOS all lacking support.
For these reasons, if you’re going to go the inline style route for controlling your spacing around images, we recommend you stick to HTML image padding.
An older method for creating spacing around your images is to include the spacing inside your images. This used to be quite commonplace but has more recently fallen out of fashion.
The advantage to this method is that it allows you to add spacing around your images without having to dive into the code. When you’re saving your images to use in your email, simply add some space in the area you desire your spacing to be before you save it out as seen in our example.
We want to add a 20 pixel space below and to the right of the image, so we add that in our image as we save it.
We already mentioned that the lack of coding knowledge needed to implement this is a big plus for this method but what about the drawbacks? First, if you want to adjust the spacing across many images it’s going to be very time consuming to edit a slew of images and save them out. Secondly, if you need to change the spacing you’ve added to an image it’s going to involve opening the image, changing the spacing and then re-exporting it.
Finally, you’ll need to make sure you’re aware of how dark mode is interacting with your email. If you’re including a colored background in your image for spacing and dark mode is altering the background color of your email it could have some adverse effects.
Overall, we don’t recommend using this method for spacing due to the drawbacks above. But if you aren’t comfortable editing email code, and you need to very quickly add spacing in one or two places, this could be a quick-fix you can employ.
Our final method of controlling the spacing around images in your email is another solution that requires neither padding or margins.
Using tables made up of rows and cells is the most common approach in email development for controlling layout. We can also use this table structure to add spacing around our images.
                                <table cellpadding="0" cellspacing="0" border="0" role="presentation">
  <tr>
    <td align="center" valign="top">
      <img src="image1.jpg" alt="Description" style="display: block;">
    </td>
  </tr>
  <tr>
    <td height="20"></td>
  </tr>
  <tr>
    <td align="center" valign="top">
      <img src="image2.jpg" alt="Description" style="display: block;">
    </td>
  </tr>
</table>
In this example we’re using a table row with an empty 20 pixel height cell in it to add spacing between two images that are stacked vertically.
While this can be a great method to quickly add some extra spacing around images without needing to dive into inline styling and modifying your CSS, it does have the drawback of adding a fair amount of code bloat.
Doing this in more than one or two places throughout your email could lead to inflated file sizes and it’s important to remember that your email file size does matter.
Including an HTML doctype in your email code is crucial for achieving consistent rendering across various email clients. However, as with many aspects of email code, it can sometimes lead to unexpected side effects.
One particular side effect that arises from including the HTML5 doctype in your email is the introduction of extra space below images when viewed in Gmail and Outlook.com. This issue can significantly impact the experience of your subscribers, especially if your design involves spliced images.
Struggling with extra space under your images in Gmail and Outlook? Don’t worry, the fixes below will help you eliminate those pesky spaces.
This is the most popular fix for the extra space below images in Gmail and Outlook. Simply add the code from below to your images and it’ll most likely remove the extra spacing.
<img src="image.jpg" alt="Description" style="display: block;">
Since this is a bug that is present in Gmail, you’ll want to include this inline on all your images because Gmail doesn’t support embedded or linked style sheets.
If your image height is greater than 16px, you can try setting the image’s “align” attribute to any of the following:
absmiddlemiddleleftrightabsbottomtexttoptop
<img src="image.jpg" alt="Description" align="absbottom" style="display: block;">
It’s important to remember that even if you’re using this align fix to alleviate the extra spacing, you’ll still want to include display:block on your images. It’s also important to note that neither align=”baseline” or align=”bottom” will work, so make sure you use a value from above.
Whether you’re implementing one of our methods for adjusting the spacing and padding around your images or using our fixes for extra space appearing in Gmail and Outlook.com, it’s imperative that you test every email, every time.
By conducting thorough testing after modifying spacing in your email code, you can catch any potential issues, optimize the visual presentation, and deliver a consistent and engaging experience to your email recipients across various email clients and devices.
With Sinch Email on Acid, you can preview your design on more than 100 clients and devices, so you know how your email will look before it hits the inbox.


